The original Voxel does not have a plate amplifier. However, I needed one but didn’t want to modify the Voxel design. Therefore a small separate enclosure for the plate amplifier is needed. Here is how I completed it.
Why a Plate Amplifier?
First, let me remind you what a plate amplifier is: It is an electronic gizmo that is commonly built into the back of a subwoofer (hence the name plate amplifier). It takes a signal from the main amplifier and generates output that can be used to drive the speaker in your subwoofer.
The incoming signal can be an unamplified low frequency signal in the case of a “2.1” stereo or “5.1” surround sound amplifier. If your main amp is blissfully unaware of the existence subwoofers, you just feed its output that would normally go to your speakers into the plate amplifier instead, which will then create a low-frequency signal for the subwoofer and pass through the rest of the signal unmodified to your speakers.
Why the Voxel Has No Plate Amplifier
There is a third type of amplifier that outputs an already amplified signal for a subwoofer. In that case no plate amplifier is needed. Paul Carmody initially designed the Voxel for use with such an amplifier. Also, one design goal for the Voxel was to build a subwoofer that is as small as possible while still performing well. And having to account for the extra volume taken up inside the cabinet by a plate amplifier would make the cabinet quite a bit bigger.
Unfortunately having a main amplifier that outputs an amplified subwoofer signal is fairly uncommon (for various good reasons). Hence people have modified the Voxel design to incorporate a plate amplifier.
Building a Separate Enclosure
Why?
For my build I decided to put the plate amplifier into a separate enclosure rather than go with a modified Voxel design. There are several reasons for this:
- Don’t screw up the design.
I don’t know enough about speaker design to come up with a modified design that would still perform well. The geometries inside the Voxel are a little challenging if you add a plate amplifier: Remember, there is also a port tube inside, and making enough room for both the port tube, the plate amplifier and the actual driver while not messing up the enclosure geometry is beyond what I can currently do. - Too many wires!
The amplifier I am using falls into the “blissfully unaware of the existence of subwoofers” category. This means that I have to feed the high level output for BOTH channels from my main amplifier to the plate amplifier (two wires) and then route the high level output from the plate amplifier to my Quarks speakers (two more wires). Also, the plate amplifier is an active component, so there is also a power cord. That’s a total of FIVE wires that would go to the subwoofer if the plate amplifier were built into it.
By keeping the plate amplifier in a separate enclosure I can keep it in close proximity to my main amplifier and then just run a single wire from that enclosure to the Voxel subwoofer. This gives me more flexibility in subwoofer placement and also makes it easier to change that placement in the future if I wanted to.How?
The basic design is very simple: Build a rectangular frame that the plate amplifier would fit into, support it on two sides using pieces of plywood, so that it wouldn’t fall over, and use DIY’d speaker grilles in the front, the back and on top. Wires would exit from a gap between the floor and the bottom of the back speaker grille. Also, having grilles on three sides rather than putting the plate amplifier into a small closed box should prevent the plate amplifier from overheating.
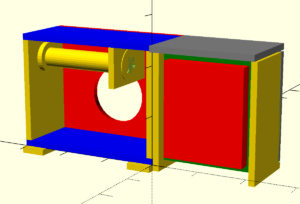
As a reminder, here is a picture of my original plan for the Voxel and the plate amplifier enclosure (seen from the back, with the back grille removed):
In a previous post I have already described how I built the rectangular frame for the plate amplifier and I had already spray-painted the pieces for the sides of the enclosure. Also I had already made the speaker grilles for the front and the back at this point.
What was left to do was to attach the sides to the rectangular box, install the plate amplifier and build some extra binding posts into the enclosure, to connect the Voxel subwoofer to. Also, the top grille needed to be completed.
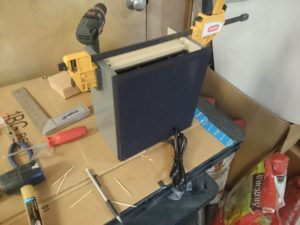
Since I was diligent in making sure the sides are nice and square as well as the frame, all I had to do at this point was to glue the sides to the frame. The easiest way to do this was to stand up the frame with the plate amplifier, measure how far in from the edge of the sides the frame should be glued and there you are:
Since these joints are not going to be stressed much I went easy on the clamps…
Here is what it looks like with one grille affixed:
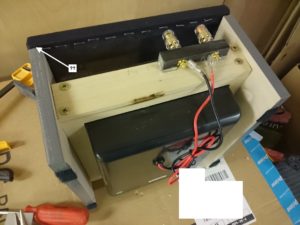
If the plate amplifier is built into the back of a subwoofer enclosure, the output from the amplifier would be directly connected to the driver. Since in my case it is in a separate enclosure, this is not going to work. Therefore I decided to connect the subwoofer output of the plate amplifier to a pair of binding posts and make the binding posts accessible from the backside of the enclosure, where all the other wire hookups are.
I did that by reusing a leftover piece of the dowel rods that I used to build the speaker grilles from: I cut a 3″ piece and then drilled some holes that I could press-fit the binding posts into. Since I neither wanted to wait for regular glue to set nor to remove the plate amplifier again for clamping, I hot-glued that 3″ piece of wood to the top of the plate amplifier frame:
This is a tight fit, but remember that the top of the plate amplifier is also going to be a speaker grille, which buys us an extra 1/2″.
Building the Top Grille
I waited until I got to this stage of the build before I cut the pieces for the speaker grille to go on top of the plate amplifier enclosure. There was a good reason for this: I wanted the top grille to be large enough to go from side to side, so I had to take the two velcro gaps between the grilles and the plywood sides into account. (That gap is marked with an arrow pointing to it in the image above).
Unfortunately there was no way to figure out how large this gap would be, short of building the enclosure, attaching the two side grilles and measuring, which is what I did.
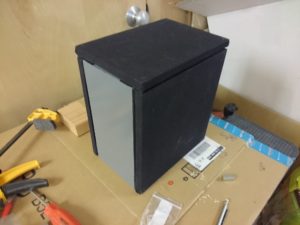
In the end this worked out quite well and here is what I got:
The plate amplifier enclosure is basically done. All that is left to do is to put some stick-on feet on the bottom and we are good to go…


