I am now the proud owner of a 3D printer…
From CAD to 3D Printing
Early in my career I made a living writing extensions to common CAD programs. — One of the extensions I worked on dealt with outputting data suitable for feeding into a CNC machine and simulating the path that the tool would take right in the CAD application. I still remember visiting our customer and watching an industrial-grade CNC laser cutter cutting parts out of a metal plate right in their machine shop.
There is a certain fascination of being able to directly turn information inside a computer (such as a CAD drawing) into a tangible real-world object.
Dabbling in Printer Design
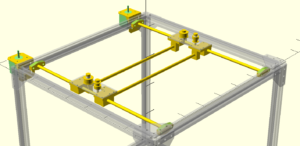
Maybe that’s why I became interested in 3D printing about two or three years ago. Back then I toyed with the idea of designing my own printer using CoreXY and a print bed that gets lowered during the build process. I toyed around with the idea for a while and fired up trusty OpenSCAD and got something:
After playing around with a few mechanical parts that I ordered I arrived at the conclusion that completing a design would involve quite a bit of prototyping and require more investment in time and money than I could justify. Hence I shelved the project.
Choosing to Buy a Printer in 2017
Fast-forward to 2017 and I realized that prices for 3D printers had come down significantly, to a point where buying individual parts from a BOM for my (never completed) design would probably cost more than an entry-level printer.
I initially considered an Anycubic Kossel Plus kit because the design goal of a Kossel-style printer is to keep the moving mass as small as possible, thereby eliminating vibrations and enabling a faster print speed and giving you better quality prints, which was in line with what I intended to do with my own design.
However, I ended up purchasing a Monoprice Maker Select v2 instead. The reason for this was that the Monoprice seemed to be a pretty decent printer for a newby: You could get going with it right out of the, with lots of room to improve the print quality further by making some fairly inexpensive modifications to it.
The Monoprice printer is just a re-branded version of the Wanhao Duplicator i3 v2.1, which in turn is a rehash of a very common design called Prusa i3, named after its creator, Josef Prusa.
Prusa style printers move the printer bed back and forth, the nozzle left to right and the entire nozzle assembly up and down. So they are pretty much the anti-thesis of what I initially had in mind, but there is no denying that this is a proven design.
Getting Started with the Monoprice Maker Select v2
I am not sure whether the “up and running in 10 minutes” that this printer is being advertised for, is generally true. It definitely wasn’t true for me. The main problem I encountered was that when I followed the initial setup instructions everything went haywire when I tried to raise the nozzle assembly (“moving the X axis up”). There are two stepper motors, one on each side, that turn threaded rods. In my case everything was fine when I attempted to lower the Z axis, but when raising it, the left hand side stepper motor seemed to not have enough torque and eventually the whole “X axis” of the printer would become crooked and jam, since only the right and side would rise.
After some troubleshooting I finally found the culprit: One of the wires on the plastic connector that you are supposed to plug into the stepper motor was lose in the connector and even tho the connector was plugged in that one wire was apparently not making contact with the prong on the stepper motor.
The frontmost wire on the “B” connector was what gave me trouble:
After fixing this I of course had to “re-level the X axis”. And the solution presented in the manual to use a level for that is just bad: First, good luck finding a level that’s small enough to fit. Second, putting a level on the side of a cylinder is never going to be very accurate, and third and foremost you don’t care about the X axis being parallel to the ground, you want it to be parallel to the printer bed/frame, which is not necessarily the same.
In my opinion the better solution is to use something like a small block of wood and raise up the X axis by manually turning the threaded rods until you get the X axis raised as high as possible and then use that small block of wood to make sure the X axis on both sides is equidistant to the top part of the printer’s frame.
Has worked great for me and no problems with this ever since.
From my initial experience with this printer I would say the quality exceeded my initial expectations. However, if you expect the operation of the printer to be plug and play like, say, using your iDevice, you will be disappointed.
However, I did not expect this to be the case and so far have been quite happy with that printer.
More on the project I purchased it for in another post…

