For the Voxel and the plate amplifier enclosure I had to make a total of four speaker grilles. Here is how to do it…
Why Grilles?
I decided to put a speaker grille on the front of the Voxel. Partly for looks, partly in the hope that the frame of the speaker grille will protect the driver from accidental damage: If you vacuum the floor, you’ll bump into the speaker grille frame first before bumping into the driver.
Also, for the plate amplifier enclosure the plan is to have the front, back and the top of the enclosure be grilles. First because I want to maximize air flow on the plate amplifier. Second, this gives you a little bit more space inside the enclosure because the thickness of the grille cloth is essentially zero compared to a 1/2″ piece of plywood, so you gain a little wiggle room for wiring.
The Plan
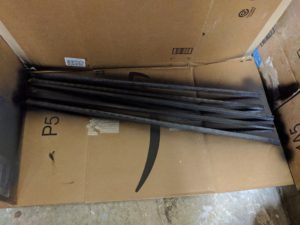
The plan was to get a bunch of 1/2″ square wood dowel rods, like these. I had also previously ordered black speaker grille cloth, which was fairly cheap.
The idea is to build rectangular frames out of the dowel rods, then drape the speaker grille cloth over the frames and staple it to the back of the frames. Use velcro to attach the speaker grilles to the Voxel cabinet/the plate amplifier enclosure.
Here is the plan that I came up with that worked fairly well:
- Spray-paint the dowel rods black. It doesn’t have to be perfect, since they will be covered in black speaker grille anyways. But since the grille cloth might be see-thru particularly when stretched over the frame, I thought it would be a good idea to do that.
- Cut the dowel rods to size: I decided to use 45 degree miter cuts, for better stability. The basic idea was “with mitered joints, applying even pressure from all sides will keep the frame in place, while this won’t work with butt joints.
- Use staples to assemble the frame out of the four mitered pieces.
- Stretch the speaker grille cloth over the frame and attach to the back of the frame using staples.
Execution
Spray Paint Rods
The dowel rods that I bought came in 36″ pieces. A quick back of the envelope calculation told me that I would need five of these to build all the frames. I started out by spray-painting five of these black. There was no priming and just a single coat on each side:
I decided to spray-paint the rods rather than the finished frames because it seemed easier to do it this way: Getting a relatively even coat of paint on all four sides of a rod is easier than getting it on all four sides after the rods are assembled into frames. Also, the plan was to spray paint, let the paint cure overnight and then start building the frames, including adding speaker cloth.
Cut The Rods and Assemble Them
Next, I cut the rods using mitered 45 degree cuts. (I still own the world’s wobbliest miter saw…) I made sure that i had pairs of rods that are exactly the same size by lining them up as pairs and evening out any inaccuracies by sanding. Here are some examples from this step:
Next, I used my two right angle clamps (that already served me well while assembling the Voxel cabinet) to align the pieces of the grille frame and stapled them together with two 3/8″ staples using a staple gun. Then rotate and do the other two corners and you get this:
Since things were still a little wobbly after this, I turned the frame over and used another staple in each corner from the opposite side.
The right angle clamps allowed me to line up the pieces of the frame pretty precisely. They held them firmly in place while I stapled them together and by making sure the frame was pushed down all the way into the bottom of the clamps I also got the frames to be nice and flat.
Here is a test-fit of one frame on the makeshift plate amplifier enclosure and it worked out quite well:
Applying the Grille Cloth
I have never done any upholstery work first, so this was guess work. After a first attempt that I didn’t like, I realized that the grille cloth (like most fabrics I presume) has threads running in one direction that are visible if you look closely. You can pick out one thread and use it as a guideline.
I eventually went with the following approach:
First, put a staple about an inch from the corner into a side that runs parallel to the thread you picked. Stretch in the direction of the thread and put another staple maybe 1 or 2 inches further down. Now put another staple on the side that is perpendicular to where you put the first staple, again about an inch from the corner.
You now have a small are with roughly the right tension. Put the next staple on the opposite (parallel) frame across from where you put the first staple, to lock in the right tension.
Next, using your thread as a guide, go down the rod where you put in the first staple, putting staples about every 1 to 2 inches. Then run down the perpendicular side. You are now done with one half/triangle of your rectangular frame. Secure the far corner of the frame (from where you started) with two staples on each side of the corner. then walk down each remaining rod again stapling every 1 to 2 inches.
Next, we need to make sure the corners look nice. I tucked under the cloth on one side in each corner, similar to what you do on the sides when you gift-wrap a box. Staple down the tucked-under in the corners and fill in the gaps between the staples that you have previously left. — This doesn’t have to be super-neat because it is on the backside of the grille. Now put aside your staple gun.
The next step is to cut off any excess grille cloth. I did that by lightly stretching it and then moving along the back edge of the frame with a pair of scissors. Once you let go of the cloth it will spring back a bit and not be visible from the front.
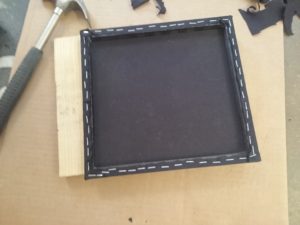
As a final step, I took a hammer hammered down all the staples to made sure they are as far into the frame as they would go. The goal is to get them flush with the back of the frame, with no staples sticking further out.
Note that while I used 3/8″ staples to assemble the frame, I used 1/4″ staples on the cloth and hammering them in well should also make sure they don’t come lose in the future.
Eventually you get something that looks like this from the back (sorry for blurry-cam):
From the front it looks much neater (minus the dust still on it that it picked up from my garage floor):
While you can actually see staples in the corner and the frame through the cloth, this turned out to not be the case once the grilles are actually mounted.
Affixing the Grilles
There are some fairly sophisticated gizmos that folks use to affix grilles to speakers. I opted a simple solution using small pieces of industrial-strength velcro for the plate amplifier and a combination of industrial strength velcro on the back of the grille with small, “regular strength” velcro on the front of the Voxel.
As a final advise I would avoid putting the velcro right at the corner of the grilles. Since this is where you “tucked under” the grille cloth, the grille is slightly thicker there, so putting the velcro there will result in a larger gap. I put it about half an inch in from the corner.


